Thursday, May 26, 2011

Resources for Homeowners

If you are a homeowner and looking for some helpful resources, I have found a few. The National Kitchen & Bath Association has a great part of their website dedicated to educating the public.  Below I posted a few of their recommended book but they also have a glossary of terms and industry lingo.  Click here for the website to learn more.

By Rosemary Bakke 
Published by Lark Books 

Branded with the authority and expertise of AARP, this essential guide will help families re-imagine, redecorate, and remodel their home for the second half of life. 


Design Ideas for Bathrooms
By Susan Boyle Hillstrom 


See what engineering and art have done to create beautiful, energy-efficient designs for fixtures and faucets. Discover what stone, glass, metal, tile, and new man-made materials can add to your bathroom. Other topics include design ideas for vanities and storage, lighting, and ventilation. “Smart Tips” and fact-filled sidebars provide information at a glance.

Small Kitchen Solutions 

Bring big style to a small kitchen! Packed with tips and tricks from the pros, this book is perfect for DIYers of any skill level. 

The New Outdoor Kitchen

Create a beautiful and functional outdoor kitchen no matter how limited your outdoor season, yard size, or budget. Includes 300 full-color photographs and an extensive resource list.

Wednesday, May 25, 2011

New Use for Potholders

Check out this clever use from lifehacker...

 Protect Your Bathroom Counters with Silicone Potholder


  Who says potholders are just for the kitchen? Silicone potholders can be used anywhere you need to protect a surface. Here, they're being used to prevent heat marks on a bathroom counter from curling irons and other personal appliances.  

Hot flat irons and curling irons make them a little unwieldy in the bathroom—where do you put those burning metal gadgets when you're done using them? Unplggd blog brings us this clever solution. Silicone potholders are inexpensive and designed to withstand high heat.

You could also extend this idea to other areas of the house, like a workshop when using soldering irons.
Check out other clever uses for common items or share your own with us in the comments.

Monday, May 23, 2011

Enter to Win!!

HGTV has an opportunity for you to win their Green Home of 2011.  It's a custom built, modern prairie style, fully furnished, eco-friendly home located in Denver - worth almost $700,000.  The home also incldes local artwork and funishings, and engineered hardwood flooring.  Enter twice a day through June 2, 2011! Once at HGTV.com and once at FrontDoor.com for your chance to win.  Below are some photos of the beauitful house that could be yours!

site preparation for hgtv green home 2011

poured foundation and walls for 2011 green home


Friday, May 20, 2011

More Photos!

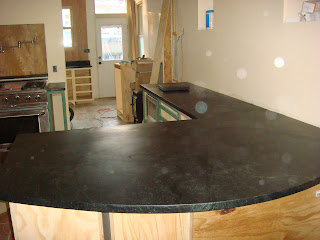
It's always nice to see finished pictures of a beautiful project but today I'm going to show you some pictures from an onsite installation of soapstone countertops done by Garden State Soapstone in Baltimore.


Thursday, May 19, 2011

Backsplashes!

HGTV has some great ideas for backsplashes for your new kitchen...


Two are Better Than One

Two kitchen backsplash materials are better than one. Candice Olson pairs soapstone and blue glass tiles in this New Orleans-inspired kitchen.


Bronze Sparkle

Install under-cabinet lighting to show off your backsplash. This Durango stone backsplash is accented with bronze tiles for a little sparkle.


Durable, Classic and Balanced

Tin backsplashes are durable, classic and a perfect balance for urban materials like concrete countertops. Candice Olson opted for cream-colored tin tiles.

Click here for the full article 

Wednesday, May 18, 2011

Get the Most From Your Drink

Since summer is right around the corner, you need to invest in these soapstone ice rocks! Avoid warm drinks - these ice cubes will keep your drink cold for hours, without watering it down! Sounds perfect to me! Find out more here!


Soapstone Ice Rocks


Tuesday, May 17, 2011

Designing For Different Generations

An article written by Anita Shaw, titled Bridging the Gap, reminds kitchen and bath designers that each generation has a different personality and specific needs. Below are the highlights but to view the article in its entirety, click here.

Bridging the Gap
By Antia Shaw
May 2011

Many different issues and elements influence which trends rise and fall and which products meet with success or failure among today’s consumers. Environment, income and individual personality all play a major role in influencing kitchen and bath design, as does another element – what generation the client belongs to (see related Editorial).

“There are different priorities from one generation to the next.”

Marston identifies the four main generations with purchasing power in today’s marketplace: The Matures are 66 and older, the Baby Boomers range in age from 47 to 65, Generation Xers are 32 to 46 years old, and the Millennials, or Generation Y, are under 30.

When selling to members of the Mature group, Marston advises that you emphasize your expertise, and make things easy for them. “They believe in dedication and sacrifice, and that experience is the best teacher,” he comments.

Baby Boomers are a core group – 80 million strong. They are the biggest generation of consumers, and their success is visible. “They are workaholics and are defined by their work, and they love their trophies,” he reports. They are interested in high-end amenities such as state-of-the-art kitchens.

The two younger generations are less focused on the team mentality of the older groups and more in tune with the idea of the “unique individual,” Marston notes.

“GenXers are the first generation that was told that they were special and unique,” he stresses. He warns that they exhaustively research everything, and are very difficult to please. “They educate themselves and don’t trust others to teach them. However, once they make the decision to trust you, they are very loyal,” Marston adds.

The last of the group – the Millennials – are only now coming into their buying power (see Inside Today's Showroom). They are an optimistic group, according to Marston, though they are busy and stressed. “The future is very short term to them, and they have huge goals,” he notes. They also want instant gratification, he stresses.


An island with a casual dining area, as seen in this kitchen by Gail Bolling of The Kitchen Co., is an important design element for today’s young family.
Janel Davenport of Janel Davenport Kitchen & Bath Design created this bamboo kitchen for a young, trendy client who was concerned about environmental issues.
Cleaner lines and transitional styling, teamed with traditional touches as shown in this Bolling kitchen, are popular with members of all generations.
In this kitchen, Rebecca Zaveloff, CKD of KitchenLab showcases a mix of materials that combine for a distinctive look for the homeowner.
Zaveloff believes a kitchen design, such as the one shown here, should reflect a timeless, classic quality rather than an overly trendy aesthetic.

Monday, May 16, 2011

Dining In Style...Sea Style


Below are some pictures from Architectural Digest that show how you can dine in style, even on your yacht! Click here for the full article.

The Kathleen Anne, a 128-foot Feadship yacht owned by a Scottish couple, includes three levels of cabins and saloons, a theater-in-the-sky lounge on the bridge deck, four guest staterooms, and a master suite.


Naval architect Arthur DeFever designed Strangelove, a 155-foot Feadship yacht, for advertising executive Mary Wells Lawrence. David Mlinaric and Jason Roberts, of Mlinaric, Henry & Zervudachi, decorated the interiors. (December 2009)


Jack Fhillips combined speed and comfort when he redesigned the 148-foot yacht Lady Kathryn III. The decorator outfitted the interiors with traditional furnishings. (January 2006)


Thursday, May 12, 2011

Outdoor Dishwasher

How would you like to add an outdoor dishwasher to your outdoor kitchen?! I heard about this from the blog, Kitchen Clarity:

Just in time for Summer, Kalamazoo Outdoor Gourmet – the people who brought you their outdoor pizza oven last year -  are first to market with a truly outdoor rated dishwasher. Wrapped in stainless steel, it’s ruggedly handsome – the innards are made by Asko, so you know it will wash the dishes well, and what makes it unique is the Winterize cycle, which drains the machine completely so you really can keep it in your outdoor kitchen all year round with no worries about freezing:

Kalamazoo's Outdoor Rated Dishwasher - available Summer 2011


So if you are fortunate enough to have kitchens both indoors and out, you no longer have to schlep the dirty dishes from one to the other – you’ll have even more time to relax and enjoy the great outdoors.

Wednesday, May 11, 2011

Wondering What Your Kitchen Remodel Return Is?

Kitchen.com has a great article on how to estimate your kitchen remodel's return on your investment.

The recession may technically be over, but when it comes to housing values, the numbers still have been sliding down. As a result, so has the return in investment on remodeling projects. However, a kitchen remodel continues to be the interior home improvement project that increases your home's value the most. According to the 2010-11 Cost vs. Value Report*, a minor kitchen remodel ties for the number 4 spot on the top 10 list of home improvment projects in terms of return on investment. Most of the remaining projects in the list are exterior replacements like an entry door or garage door, which tend to be less expensive projects than kitchens and also fall into the "must-do" rather than "nice-to-do" category.

The numbers reported below are national averages; in general, the Pacific states region outperformed the rest of the nation despite slightly higher costs. For example, on the West Coast, a minor kitchen remodel averages a cost of $23,603, with a return of 84.1 percent. In the East North Central (Great Lakes) region, however, the same project costs $22,239, with a return of just 63.7 perecent.

Minor Kitchen Remodel, Mid-RangeThe 2010-11 report puts the national average price of a mid-range minor kitchen remodel at $21,695, averaging a return of 72.8 percent (down several point's from last year’s 78.3 percent) a year later. What is a minor kitchen remodel? According to Remodeling, it’s a 200-square-foot kitchen with 30 linear feet of cabinetry and countertops. The cabinets get refaced with new raised-panel wood doors, drawers and hardware, but the boxes stay. Laminate countertops and vinyl flooring are removed and replaced with the same material, but in updated colors and patterns. You also get a new, energy-efficient wall oven and cooktop, a new mid-priced sink and faucet, wall covering, and a new paint job on your trim.

Major Kitchen Remodel, Mid-RangeA major kitchen remodel at a mid-range price will run an average of $58,367, according to the report. A year later, you can expect to recoup 68.7 percent (down from 72.1 percent) of that. This 200-square-foot kitchen features a 3-by-5-foot island, 30 linear feet of semi-custom wood cabinets, laminate countertops, and a double-bowl stainless-steel sink with single-lever faucet. Add new energy-efficient appliances: wall oven, cooktop, ventilation system, built-in microwave, dishwasher, garbage disposal, and custom lighting. Finish up with new vinyl flooring and paint for the walls, trim and ceiling.

Major Kitchen Remodel, UpscalePrice tag: $113,464, according to the report, with an ROI of 59.7 percent (down from 63.2 percent). It's an easy bill to run up in a 200-square-foot kitchen with 30 linear feet of custom cherry cabinets with interior accessories, natural stone countertops, and an imported ceramic or glass tile backsplash. Appliances include a built-in refrigerator, cooktop, 36-inch commercial-grade range and vent hood, built-in warming drawer, trash compactor and built-in microwave/convection oven. Then add a high-end undermount sink; designer faucets; built-in water filtration system; general, task and under-cabinet lighting; cork flooring; and cherry trim.

*The 2010-11 Cost vs. Value Report—a joint study done by the National Association of Realtors and Remodeling magazine—provides national and regional averages. The report estimates the cost of an average home improvement project and compares it to the value it would recoup if the home sold a year later. In 2010, more than 3,000 real-estate agents, brokers and appraisers in 80 cities provided ROI estimates.

Tuesday, May 10, 2011

Keep Your Wood Countertops Looking Brand New!


Straight from the experts! Here are some tips on daily maintenance, scratch removal, and how to apply a top coat to your wood countertops:


Daily Maintenance

  • Use a 20%-80% vinegar/water solution to clean your top. 
  • Do NOT use ammonia-based cleaners; over time they will soften and cloud the finish.
  • Do NOT use cleaners with bleach in them; they can cause the finish to dry out and, possibly, flake.

The top can also be wiped down with a mild hand or dish soap that does not contain ammonia or bleach.  Rinse the top with clean water, wipe dry. After it is dry, mist the top with the vinegar solution and let dry.  There is solid evidence that the vinegar solution will disinfect the top.
Scratch Removal

To cover/remove scratches in finish (not deep into the wood)

  • Start with 000 Steel Wool wrapped around a sanding block.  Rub over scratched area in a back and forth motion, always with the grain.  You will not need to completely remove the scratch – you are only altering the finish surface to prepare for another coat. Use enough pressure to scuff the edges of the scratch and the area immediately surrounding it, but not enough to wear down the bare wood. 

  • Clean scuffed area with a dry rag and follow up with a tack cloth to remove any debris from the area to be oiled.  DO NOT USE ANY WATER – BASED CLEANERS.

  • Apply Craft Art Stain Oil Finish by pouring a small amount (size of a dime) on the scratched area.  Then rub in a circular motion with a clean rag to spread the oil around the scratched area.  Do not spread further than necessary away from scratched area (an inch or two will be sufficient).  Rub area until oil just starts to dry up.

  • Next, before oil is fully dry, switch to a clean rag and buff the area surrounding the scratch, removing as much of the oil from the surface area as possible while at the same time rubbing it into the scratch.  This process is vaguely similar to waxing a scratch on a car.

  • Steps can be repeated if scratch is still visible after oil is completely dry.

Application of Fresh Topcoat

To apply a fresh top coat (on top of worn finish, not complete refinish)

  • We highly recommend covering the floor surrounding your countertop with plastic before starting this process

  • Turn off any overhead ceiling fans and ensure that you have a dust-free environment when following these instructions.

  • Start with 00 Steel Wool, or 320 grit sandpaper, wrapped around a sanding block.  Rub in 1-2 foot, straight strokes, always with the grain.  You do not want to completely remove the finish.  The goal is to just scuff the entire surface area to give a fresh coat something to adhere to.

  • If your top has a detailed (not flat) edge profile, take the steel wool or sandpaper in your hand and scuff the edge profile being careful around sharp edges as they are very easy to sand down to bare wood.  Again, you are only trying to scuff the surface for proper adhesion of the fresh coat.

  • Clean scuffed area with a dry rag and follow up with a tack cloth to remove any debris from the area to be oiled.  DO NOT USE WATER-BASED CLEANERS.

  • Pour a generous amount (varying depending on the size of your top) of Craft Art Satin Oil Finish into a standard paint tray.  Using a short-bristled paint pad (available at most hardware/home center), spread the oil out to the edge of your top.  Keep a clean rag handy to wipe away any oil that runs over the edge.  Apply additional oil if necessary to cover entire top.

  • Once your entire top is covered with a generous coat of oil (thick enough to write in with your fingertip, but not so thick that it will continue to run over the edges after wiping them), use the short-bristled pad to even the oil out.  Starting at one end of your island in the center (or at the wall perimeter tops), drag the pad all the way down the top in one long pass, going with the grain at all times.  Do this in long, straight strips, applying just enough pressure to smooth out the oil, but not enough to drag a large build-up of oil along with the pad.  Stopping at any point before reaching the end of the top will result in a noticeable ‘lap mark’ in the finish.  Once at the end of one strip, have a clean rag handy to wipe up any oil running over the edge.  Start back at the other end, moving the pad toward you to start another strip and repeat the process, barely overlapping the last.

  • Repeat until the entire top has been smoothed out.  If applied correctly, with proper amount of material, the topcoat of oil should self-level, eliminating any bristle strokes in the finish. 

  • Do not place a fan near the top for at least six hours.  Failure to follow this instruction will result in dust particles in your finish and potentially an uneven surface finish.

  • Allow 24 hours for the oil to dry.  There is a chance that you may have to apply multiple coats to achieve your desired look.  If you choose to do another coat, repeat the instructions above.  Be sure the oil is not soft or tacky before starting the additional coat(s).  If it is, allow more time to dry. 

  • After the final coat is applied, allow to dry at least 24 hours before using your top.  If after 24 hours the topcoat still feels soft or tacky, wait until fully dry and smooth before using.  

  • If your top is deeply scratched or worn down to bare wood, you will need a full sand and refinish.  We recommend enlisting the help of a local cabinet shop to complete the repair.


Friday, May 6, 2011

On Site Fabrication


Ever wonder what goes on behind the scenes? Here are some photos a happy client from Long Island just send us of the on site fabrication.